Showing posts with label DIY. Show all posts

Tuesday, November 8, 2011

All I Want is 4 inch Pink Glitter Heels...

And apparently, that's too much to ask for! I've searched EVERYWHERE for the perfect pair of pink glitter heels that have the right height heel and aren't hideous. 

So, I'm making my own. 

Wish me luck?

Favors & Centerpieces!

I mentioned a few times that I've found my favors and centerpieces! Well...I mean...in all honesty it was my mom who found them, drove all around Utah with me to find what we needed, and came up with the ideas. I just agreed. 

These are the favors! We're going to have the mini mason jars for one reception and then the other little jars for the other. (I haven't decided which quite yet) And the ribbon is going to get wrapped around it. The little flowers are going to get hot glued onto the tops of the little jars and on the side near the little clasp on the mason jars (I think. They might go on the top but I think they're going to end up on the side) 


 The pitches below are going to the centerpieces. I'm going to buy flowers in bulk myself the day of and then arrange them myself (for both receptions. We'll be shipping these to Michigan. Double duty! Score!) Some of them will have the green ribbon wrapped around the top and some will have the pink (both are 2 of our 3 colors). The daisy lace ribbon will get added to all of them with the pink or green ribbon for an extra cute little shabby chic vintage touch. 


I can't wait to start working on these! :)

Friday, October 28, 2011

I'm a DIY Bride

'Tis true.

And I am totally okay with that. I've always been what I deem a wanna-be creative person. I have all these ideas bouncing around up there in my little noggin but due to sheer laziness, being intimidated, lack of funds, or a combination of all four, I rarely really craft like all the amazing blogs I follow on here (confession time real quick: I secretly want to 'bloggy famous'. I know. It's embarrassing, right? But, what can I say? I just really want to have one of those cute blogs that has bunches of tutorials and readers and know that someone likes what I write and create...Ok...back to non-embarrassing items.) 

Now that we have THAT awkward confession out of the way...let's move back to the task at hand. So, I have this awesome opportunity to be a DIY bride, right? I get to have a hand in everything that goes into my wedding. I've always been a the-knot.com stalker (okay. confession #2. I've been stalking that website for years. Okay. Stop laughing now.) but I've never really had a solid idea of exactly what I want. But now that I have a budget, a date, and that one important thing...a groom ;) I can finally dream!

We're going to be having a romantic, rustic vintagey themed wedding (I hate that word. Theme. Blech. It conjures up visions of hot pink zebra print or butterflies everywhere or crystals dripping from everything because it's a crystal themed wedding. Alright, I'm stopping before I loose anyone else who had a themed wedding) 

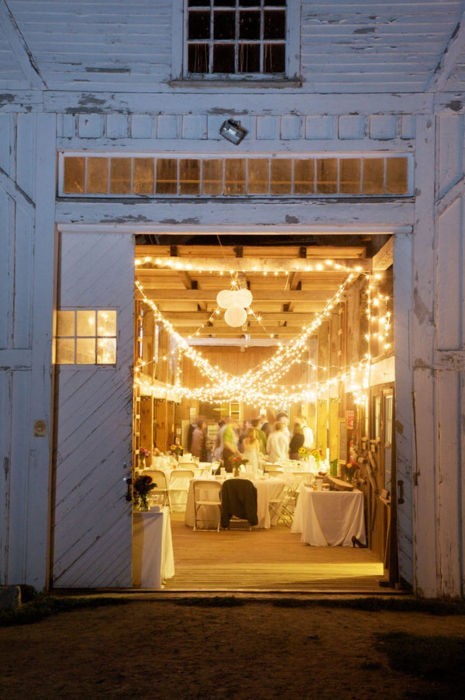
So, we're going with a rustic feel to the reception. And to accomplish that we're (hopefully) going here: 

(source) 
I say hopefully because they don't set their prices until Mid-November for the next year. Meaning, they don't actually start booking dates until they set their prices. Stressful, hey? But, I'm confident it'll work out. ;) 

The inside will be filled with twinkling lights 
(pinterest)

Said lights will be bought right after Christmas to save $$$. We all know that the day after Christmas, those suckers go on sale. The word 'Sale', by the way, is a DIY-Bride's favorite word. 

I'm also making my own centerpieces and will be arranging the flowers myself after buying them from a wholesale shop that's down the street from my house. This week (after I recovered from being on my death bead) my mom and I drove all over Utah to pick up these puppies: 
(actually, they're the white ones to the left, but you get the idea) 

And some cute ribbon to match our colors (honeydew green, tulip pink, and chocolate brown) to tie around them to add a pop of color.

I've got a few other ideas bouncing around in my head (thanks a lot to pinterest really) that I'm going to be working on in the next few months. I'm really excited to continue planning and to see this turn out to be a wonderful day. But, in all honesty, as long as I get married in the Temple to my best friend, the rest is just icing on the cake. Because let's face it...my future hubs is all kinds of adorbs isn't he?


Sunday, July 31, 2011

chalkboard platters

I think it's something in this mountain air...but I've been feelin way crafty lately. Usually, I have all of these ideas, but I can never make them come to fruition (look at that big girl vocab I'm using!) 

I was on Pinterest the other night browsing for some decoration/DIY/crafty things that I could pretend that I would do, but in the end not really do. I found a picture of some old platters that had been turned into chalkboard and got inspired! There's a large wall on one side of my apartment that has been begging for some love. So, after my usual 3 or 4 hour of job searching, I took a break and headed to Deseret Industries Thrift Store to see what I could find. And find I did! 

In case you want to do this yourself, you'll need: 

metal platters from a thrift store - $3 for 3 plates

chalkboard spray paint - $6 at Michael's (they also make normal paint, but I found the spray paint to be easier)

blue painters tape (I didn't use this, but if you want to be real careful and preserve the edges of your platter, then this might be useful) 

ribbon in whatever color matches the room - $2.00 on sale at Michael's 

newspaper

Liquid Nails glue - $4 from Michael's 

nails for hanging - $2.99 for a pack of picture hangers at Target)

soup can (or a hammer...but if you're like me, you can use a soup can...)

3 Bucks for all three of these!!!


Take the platters outside and place them on some newspaper if you don't want to get the ground dirty. If you want, you can put some painters tape around the edges if you want to preserve them but I was too lazy and at this point I just wanted to get them done. I was careful and if I did get the paint on the edges, I took a damp cloth and wiped it. Worked like a dream. A lazy girls dream...


In a sweeping motion, apply a thin coat over the entire platter. If you're trying to keep the sides clean, just be careful and spray it in smaller portions to better control where the paint goes. 


Once they're painted with one coat, let them dry for 30 minutes or so...whenever they're not shiny anymore. Paint a second layer on. This is really important because if you don't paint 2 layers on, the chalkboard effect won't work. So don't skip this! 


Let them dry for a couple of hours until they're semi-dry. You can then add the ribbon. The glue needs to cure on the ribbon over night so if you do this while the paint is almost dry, you don't have to wait twice to let the plate dry and then the glue dry. 


This is what it looks like when they're dry! Take the ribbon and cut it to the length desired. I cut mine to about 12 inches. Enough to hang them easily on a nail. 


Put glue on BOTH the back of the plate and the ribbon. Press and hold in place for like 30 seconds. 


Do the same thing on the other side making sure that the ribbon is going to hang without being twisted like it is above and below. 


Let the plates dry over night. 

The next day, place the nails where you want them to hang. Keep in mind that the plates will hang lower than where the nail is because of the ribbon (This might be obvious, but I made a mistake hanging the first one because I didn't realize it! ha) 


Hang, draw, and ENJOY! 


(the last two images were taken from my iPhone which is why the resolution is fuzzy. :( sorry!) 

I love these! I've got my shopping list on the biggest one and they're just fun to doodle on! :) If you do this one, let me know! I'd love to see how someone else does it!